Trigger & Safety Stripdown
Basic operation Explained
The Trigger mechanism on the stealth can seem a little
convoluted in its operation. However, once the basic principles are understood,
it's a simple and robust unit. The only adjustment of the trigger itself is for
over-travel (the amount of movement left in the trigger after the sear has been
released). The trigger 'shoe' or finger-piece may also be adjusted for comfort.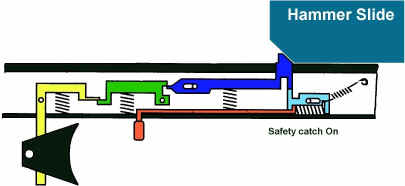
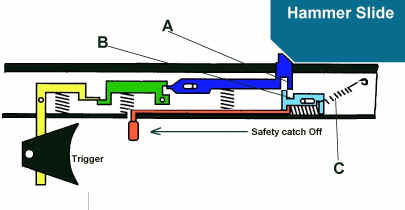
The basic principle of operation relies 3 steel 'bars'. These are the Trigger Bar (Yellow), The Intermediate Bar (green) and the Sear Bar (Blue).
These bars are balanced in equilibrium on locating pins and assisted by small springs. When aligned and 'set' the Sear bar resists shear movement in the vertical plane which is exerted by the Hammer Slide pressing against its inclined face.
 There
is also a safety catch (light blue) which is essentially a Baulking Piece which
prevents movement of the Sear until it is physically disengaged prior to
operating the trigger. This is achieved by sliding the baulk piece out of
engagement by means of a steel rod acting on a cutout in the baulk piece. On
earlier Stealths this done by pulling the safety catch to the rear - on later
models this is done by pushing the safety catch forwards.
There
is also a safety catch (light blue) which is essentially a Baulking Piece which
prevents movement of the Sear until it is physically disengaged prior to
operating the trigger. This is achieved by sliding the baulk piece out of
engagement by means of a steel rod acting on a cutout in the baulk piece. On
earlier Stealths this done by pulling the safety catch to the rear - on later
models this is done by pushing the safety catch forwards.
See here for a schematic.
Once the safety has been disengaged, the sear drops slightly preventing the baulk piece re-engaging (this is the audible 'click' when you take off the safety catch) and the Hammer is then held only by the Trigger mechanism.
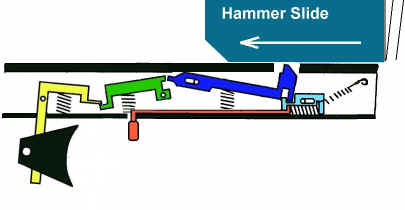 When
the Trigger is pulled, the Trigger bar trips its intermediate neighbour causing
it to rotate about its locating pin. This in turn allows the hitherto locked
'nose' of the Blue Sear Bar to rise, 'breaking' the equilibrium of the bar
system and allowing the rear of the sear to fall. This releases the hammer slide
and allows it to commence its journey to strike the air valve.
When
the Trigger is pulled, the Trigger bar trips its intermediate neighbour causing
it to rotate about its locating pin. This in turn allows the hitherto locked
'nose' of the Blue Sear Bar to rise, 'breaking' the equilibrium of the bar
system and allowing the rear of the sear to fall. This releases the hammer slide
and allows it to commence its journey to strike the air valve.
Re-cocking the rifle allows each of the trigger springs to reassert themselves and the trigger bars automatically return to their previous state, (Top picture) the safety baulk piece slides back beneath the sear and the Trigger Mechanism is once again locked and ready.
The following pages contain detailed instructions on how
to disassemble the
Trigger and Safety mechanisms